Note
Access to this page requires authorization. You can try signing in or changing directories.
Access to this page requires authorization. You can try changing directories.
Applies to:
- Microsoft Defender for Endpoint Plan 1
- Microsoft Defender for Endpoint Plan 2
- Microsoft Defender XDR
Want to experience Defender for Endpoint? Sign up for a free trial.
This article describes deploying the Defender for Endpoint on iOS (using the Microsoft Defender app) with Microsoft Intune Company Portal enrolled devices. For more information about Microsoft Intune device enrollment, see Enroll iOS/iPadOS devices in Intune.
Before you begin
Ensure you have access to the Microsoft Intune admin center and the Microsoft Defender portal.
Ensure iOS enrollment is done for your users. Users need to have a Defender for Endpoint license assigned in order to use the Microsoft Defender app. Refer to Assign licenses to users for instructions on how to assign licenses.
Ensure that end users have the Company Portal app installed, have signed in, and have completed enrollment.
Note
The Microsoft Defender app is available in the Apple App Store.
This section covers:
Deployment steps (applicable for both Supervised and Unsupervised devices)- Administrators can deploy Defender for Endpoint on iOS via Microsoft Intune Company Portal. This step isn't needed for VPP (volume purchase) apps.
Complete deployment (only for Supervised devices)- Administrators can select to deploy any one of the given profiles.
- Zero touch (Silent) Control Filter - Provides Web Protection without the local loopback VPN and enables silent onboarding for users. The app is automatically installed and activated without the need for users to open the app.
- Control Filter - Provides Web Protection without the local loopback VPN.
Automated Onboarding setup (only for Unsupervised devices) - Administrators can automate the Defender for Endpoint onboarding for users in two different ways:
- Zero touch (Silent) Onboarding - The Microsoft Defender app is automatically installed and activated without the need for users to open the app.
- Auto Onboarding of VPN - Defender for Endpoint VPN profile is automatically set up without having the user to do so during onboarding. This step isn't recommended in Zero touch configurations.
User Enrollment setup (only for Intune User Enrolled devices) - Administrators can deploy and configure the Defender for Endpoint app on the Intune User Enrolled devices also.
Complete onboarding and check status - This step is applicable for all enrollment types to ensure app is installed on the device, onboarding is completed, and device is visible in the Microsoft Defender portal. It can be skipped for the zero touch (silent) onboarding.
Deployment steps (applicable for both Supervised and Unsupervised devices)
Deploy Defender for Endpoint on iOS via Microsoft Intune Company Portal.
Add iOS store app
In the Microsoft Intune admin center, go to Apps > iOS/iPadOS > Add > iOS store app and select Select.

On the Add app page, select Search the App Store and type Microsoft Defender in the search bar. In the search results section, select Microsoft Defender and select Select.
Select iOS 15.0 as the Minimum operating system. Review the rest of information about the app and select Next.
In the Assignments section, go to the Required section and select Add group. You can then choose the user groups that you would like to target Defender for Endpoint on iOS app. Select Select, and then select Next.
Note
The selected user group should consist of Microsoft Intune enrolled users.

In the Review + Create section, verify that all the information entered is correct and then select Create. In a few moments, the Defender for Endpoint app should be created successfully, and a notification should show up at the top-right corner of the page.
In the app information page that is displayed, in the Monitor section, select Device install status to verify that the device installation completed successfully.


Complete deployment for supervised devices
The Microsoft Defender app offers enhanced capabilities on supervised iOS/iPadOS devices, using the advanced management features of the platform. It also delivers Web Protection without the need for a local VPN setup on the device. This ensures a seamless user experience while safeguarding against phishing and other web-based threats.
Administrators can use the following steps to configure supervised devices.
Configure Supervised Mode via Microsoft Intune
Configure supervised mode for the Microsoft Defender app through an App configuration policy and a Device configuration profile.
App configuration policy
Note
This app configuration policy for supervised devices is applicable only to managed devices and should be targeted for ALL managed iOS devices as a best practice.
Sign in to the Microsoft Intune admin center and go to Apps > App configuration policies > Add. Select Managed devices.

In the Create app configuration policy page, provide the following information:
- Policy Name
- Platform: Select iOS/iPadOS
- Targeted app: Select Microsoft Defender for Endpoint from the list

In the next screen, select Use configuration designer as the format. Specify the following properties:
- Configuration Key:
issupervised - Value type: String
- Configuration Value:
{{issupervised}}

- Configuration Key:
Select Next to open the Scope tags page. Scope tags are optional. Select Next to continue.
On the Assignments page, select the groups that receive this profile. For this scenario, it's best practice to target All Devices. For more information on assigning profiles, see Assign user and device profiles.
When deploying to user groups, users must sign in to their devices before the policy is applied.
Select Next.
On the Review + create page, when you're done, choose Create. The new profile is displayed in the list of configuration profiles.


Device configuration profile (Control Filter)
Note
For devices that run iOS/iPadOS (in Supervised Mode), there's a custom .mobileconfig profile available, called the ControlFilter profile. This profile enables Web Protection without setting up the local loopback VPN on the device. This gives end users a seamless experience while still being protected from phishing and other web-based attacks.
However, the ControlFilter profile doesn't work with Always-On VPN (AOVPN) due to platform restrictions.
Administrators deploy any one of the given profiles.
Zero touch (Silent) Control Filter - This profile enables silent onboarding for users. Download the config profile from ControlFilterZeroTouch.
Control Filter - Download the config profile from ControlFilter.
Once the profile is downloaded, deploy the custom profile. Follow these steps:
Navigate to Devices > iOS/iPadOS > Configuration profiles > Create Profile.
Select Profile Type > Templates and Template name > Custom.

Provide a name of the profile. When prompted to import a Configuration profile file, select the one downloaded from the previous step.
In the Assignment section, select the device group to which you want to apply this profile. As a best practice, this should be applied to all managed iOS devices. Select Next.
Note
Device Group creation is supported in both Defender for Endpoint Plan 1 and Plan 2.
On the Review + create page, when you're done, choose Create. The new profile is displayed in the list of configuration profiles.

Automated Onboarding setup (only for Unsupervised devices)
Administrators can automate onboarding to Defender for Endpoint for users in two different ways with Zero touch (Silent) Onboarding or Auto Onboarding of VPN.
Zero-touch (Silent) onboarding to Defender for Endpoint
Note
Zero-touch can't be configured on iOS devices that are enrolled without user affinity (user-less devices or shared devices).
Administrators can set up Microsoft Defender for Endpoint for silent deployment and activation. In this process, the administrator creates a deployment profile, and the user is notified of the installation. Defender for Endpoint is then automatically installed without requiring the user to open the app. Follow the steps in this article to configure zero-touch or silent deployment of Defender for Endpoint on enrolled iOS devices:
In the Microsoft Intune admin center, go to Devices > Configuration Profiles > Create Profile.
Choose Platform as iOS/iPadOS, Profile type as Templates and Template name as VPN. Select Create.
Type a name for the profile and select Next.
Select Custom VPN for Connection Type and in the Base VPN section, enter the following:
- Connection Name: Microsoft Defender for Endpoint
- VPN server address:
127.0.0.1 - Auth method: "Username and password"
- Split Tunneling:
Disable - VPN identifier:
com.microsoft.scmx - In the key-value pairs, enter the key
SilentOnboardand set the value toTrue. - Type of Automatic VPN:
On-demand VPN - Select Add for On Demand Rules, and then select I want to do the following: Connect VPN, and then set I want to restrict to: All domains.

- To mandate that VPN can't be disabled in users device, administrators can select Yes from Block users from disabling automatic VPN. By default, it's not configured and users can disable VPN only in Settings.
- To allow users to change the VPN toggle from within the app, add
EnableVPNToggleInApp = TRUE, in the key-value pairs. By default, users can't change the toggle from within the app.
Select Next and assign the profile to targeted users.
In the Review + Create section, verify that all the information entered is correct, and then select Create.

After this configuration is done and synced with the device, the following actions take place on the targeted iOS devices:
- Defender for Endpoint is deployed and silently onboarded. The device is visible in the Microsoft Defender portal after it's onboarded.
- A provisional notification is sent to the user's device.
- Web Protection and other features are activated.
In some cases, for security reasons like password changes, multifactor authentication, and so on, zero-touch onboarding might require end user to manually sign-in in the Microsoft Defender app.
A: For first time onboarding scenarios, end users receive a silent notification.

End users should take the following steps:
Open the Microsoft Defender app or tap on the notification message.
Select the enrolled enterprise account from the account picker screen.
Sign in.
The device is onboarded and starts reporting to the Microsoft Defender portal.
B: For already onboarded devices, end users see a silent notification.

Open the Microsoft Defender app, or tap the notification.
When prompted by the Microsoft Defender app, sign in.
After this, the device starts reporting to the Microsoft Defender portal again.
Note
- Zero touch setup can take up to 5 minutes to complete in the background.
- For supervised devices, administrators can set up Zero touch onboarding with the ZeroTouch Control Filter Profile. In this case, the Defender for Endpoint VPN Profile isn't installed on the device, and Web protection is provided by the Control Filter Profile.
Auto-Onboarding of VPN profile (Simplified Onboarding)
Note
This step simplifies the onboarding process by setting up the VPN profile. If you're using Zero touch, you don't need to perform this step.
For unsupervised devices, a VPN is used to provide the Web Protection feature. This isn't a regular VPN and is a local/self-looping VPN that doesn't take traffic outside the device.
Administrators can configure autosetup of VPN profile. This automatically sets up the Defender for Endpoint VPN profile without having the user to do so while onboarding.
In the Microsoft Intune admin center, go to Devices > Configuration Profiles > Create Profile.
Choose Platform as iOS/iPadOS and Profile type as VPN. Select Create.
Type a name for the profile and select Next.
Select Custom VPN for Connection Type and in the Base VPN section, enter the following:
- Connection Name: Microsoft Defender for Endpoint
- VPN server address:
127.0.0.1 - Auth method: "Username and password"
- Split Tunneling:
Disable - VPN identifier:
com.microsoft.scmx - In the key-value pairs, enter the key
AutoOnboardand set the value toTrue. - Type of Automatic VPN: On-demand VPN
- Select Add for On Demand Rules and select I want to do the following: Connect VPN, I want to restrict to: All domains.

- To ensure that the VPN can't be disabled on a users' device, administrators can select Yes from Block users from disabling automatic VPN. By default, this setting not configured and users can disable VPN only in Settings.
- To allow users to change the VPN toggle from within the app, add
EnableVPNToggleInApp = TRUE, in the key-value pairs. By default, users can't change the toggle from within the app.
Select Next, and assign the profile to targeted users.
In the Review + Create section, verify that all the information entered is correct, and then select Create.

User Enrollment setup (only for Intune User Enrolled devices)
Microsoft Defender app can be deployed to iOS devices with Intune User Enrolled devices using the following steps.
Admin
Set up User Enrollment Profile in Intune. Intune supports account driven Apple User Enrollment and Apple User Enrollment with Company Portal. Read more about the comparison of the two methods and select one.
Set up SSO Plugin. Authenticator app with SSO extension is a prerequisite for user enrollment in an iOS device.
- Create a Device configuration Profile in Intune. See Microsoft Enterprise SSO plug-in for Apple devices.
- Ensure to add these two keys in the device configuration profile:
- App bundle ID: Include the Defender App bundle ID in this list
com.microsoft.scmx - Another configuration: Key:
device_registration; Type:String; Value:{{DEVICEREGISTRATION}}
- App bundle ID: Include the Defender App bundle ID in this list
Set up the MDM Key for User Enrollment.
In the Intune admin center, go to Go to Apps > App configuration policies > Add > Managed devices.
Give the policy a name, and then select Platform > iOS/iPadOS.
Select Microsoft Defender for Endpoint as the target app.
On the Settings page, select Use configuration designer, and add
UserEnrollmentEnabledas the key, with the value type asString, and the value set toTrue.Administrators can push the Microsoft Defender app as a required VPP app from Intune.
End User
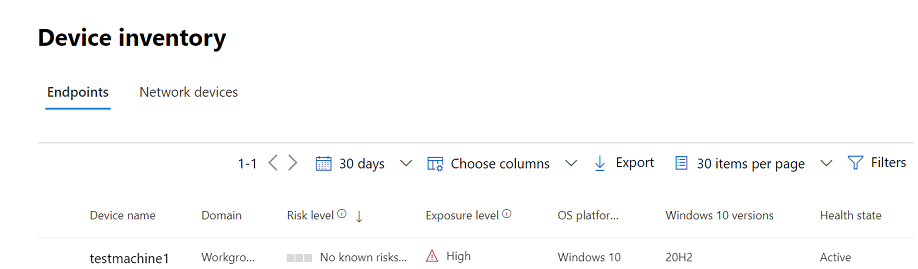
The Microsoft Defender app is installed into the users' devices. Each user signs in and completes the onboarding process. Once the device is successfully onboarded, it's visible in the Microsoft Defender portal, under Device Inventory.
Supported features and limitations
- Supports all the current capabilities of Defender for Endpoint on iOS. These capabilities include Web protection, Network Protection, Jailbreak detection, Vulnerabilities in OS and Apps, and Alerting in the Microsoft Defender portal.
- Zero touch (silent) deployment and auto onboarding of VPN isn't supported with User Enrollment since Administrators can't push a device wide VPN profile with User Enrollment.
- For vulnerability management of apps, only apps in the work profile will be visible.
- It can take up to 10 minutes for newly onboarded devices to become compliant if targeted by compliance policies.
- For more information, see User Enrollment limitations and capabilities.
Complete onboarding and check status
Once Defender for Endpoint on iOS has been installed on the device, you see the app icon.
Tap the Defender for Endpoint app icon (Defender) and follow the on-screen instructions to complete the onboarding steps. The details include end users acceptance of iOS permissions required by the Microsoft Defender app.
Note
Skip this step if you configure zero touch (silent) onboarding. Manually launching application isn't necessary if zero touch (silent) onboarding is configured.
Upon successful onboarding, the device starts showing up on the Devices list in the Microsoft Defender portal.

Next Steps
- Configure app protection policy to include Defender for Endpoint risk signals (MAM)
- Configure Defender for Endpoint on iOS features
Tip
Do you want to learn more? Engage with the Microsoft Security community in our Tech Community: Microsoft Defender for Endpoint Tech Community.